SOLIDWORKS Task Scheduler - Part 4
Welcome to part 4 of our blog series covering the SolidWorks Task Scheduler.
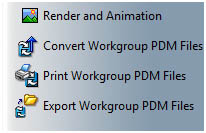
In this blog article, we will cover the last four sections: Render and Animation, Convert Workgroup PDM Files, Print Workgroup PDM Files, and Export Workgroup PDM Files
Render and Animation
Render and Animation manages rendering and animation tasks. In the SOLIDWORKS Task Scheduler dialog box, if you click on Render and Animation, the Help topic pops up.
The Help file states, “You can use Task Scheduler to manage rendering tasks you set up in PhotoView or animation tasks you set up in Motion Studies. You must start the tasks in PhotoView or Motion Studies before you can manage them in Task Scheduler.” What that is telling us is that all of the options for these tasks are controlled within SOLIDWORKS itself.
Scheduling PhotoView Renderings
PhotoView 360 is a SOLIDWORKS add-in that produces photo-realistic renderings of SOLIDWORKS models. The rendered image incorporates the appearances, lighting, scene, and decals included with the model. PhotoView 360 is available with SOLIDWORKS Professional or SOLIDWORKS Premium. If you do not have this Add-in, then you can skip to the next section.
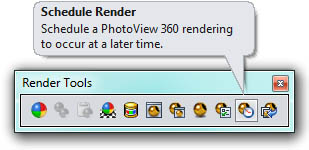
In SOLIDWORKS, add in PhotoView 360 and then pull down the Photoview 360 menu and pick Schedule Render. (This is also found on Render Tools toolbar).
This option allows you to schedule a rendering at a specified time and save it to a file. This is extremely useful since large renderings require a lot of CPU usage and can take several hours to complete. Rather than babysitting your computer, you can schedule this process at a time when you are not around.
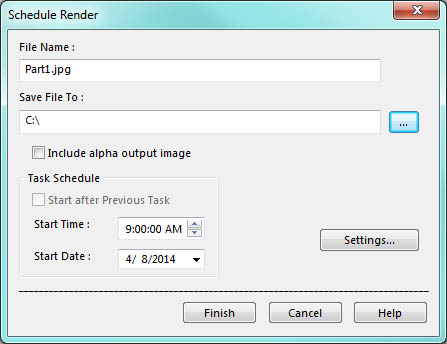
In the Schedule Render dialog box, give the output file a name. Note that the default file type is set in the PhotoView Options PropertyManager, in Image format.
Next, set the directory where the file will be saved. Note that the default directory is set up in the PhotoView Options PropertyManager, in Default image path.
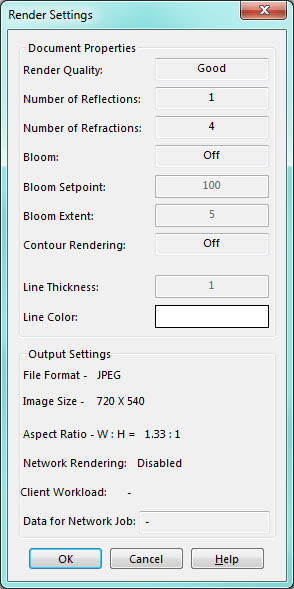
The Settings button opens a read-only list of settings related to the rendering.
Before you schedule your render, make sure that SOLIDWORKS Task Scheduler is open. SOLIDWORKS Task Scheduler must be open at the time of the render. SOLIDWORKS itself does not have to be open.
You can schedule a Start Time and Start Date that is convenient for you. If Start after Previous Task is checked, then the start time and date will be grayed out. Start after Previous Task is only available when another rendering is scheduled.
Click the Finish button when you are ready to schedule the task.
Scheduling Animation Tasks
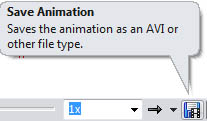
From a SOLIDWORKS motion study, click Save Animation (MotionManager toolbar).
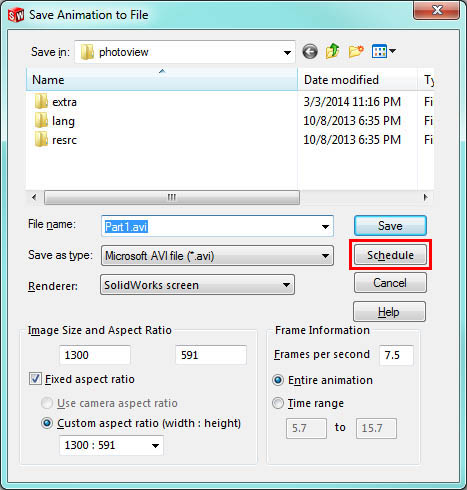
Click Schedule in the Save Animation to File dialog box.
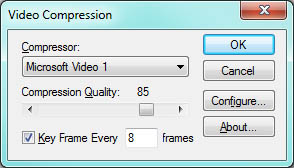
Select options in the Video Compression dialog box and click OK.
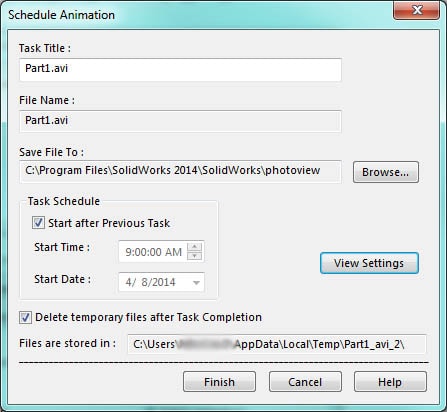
The Schedule Animation dialog box is really easy to use. You simply name your task, and specify a file name and location. Setting the start and end time is the same as before. Remember that if Start after Previous Task is checked, then the start time and date will be grayed out. The View Settings button lets you check the animation settings.
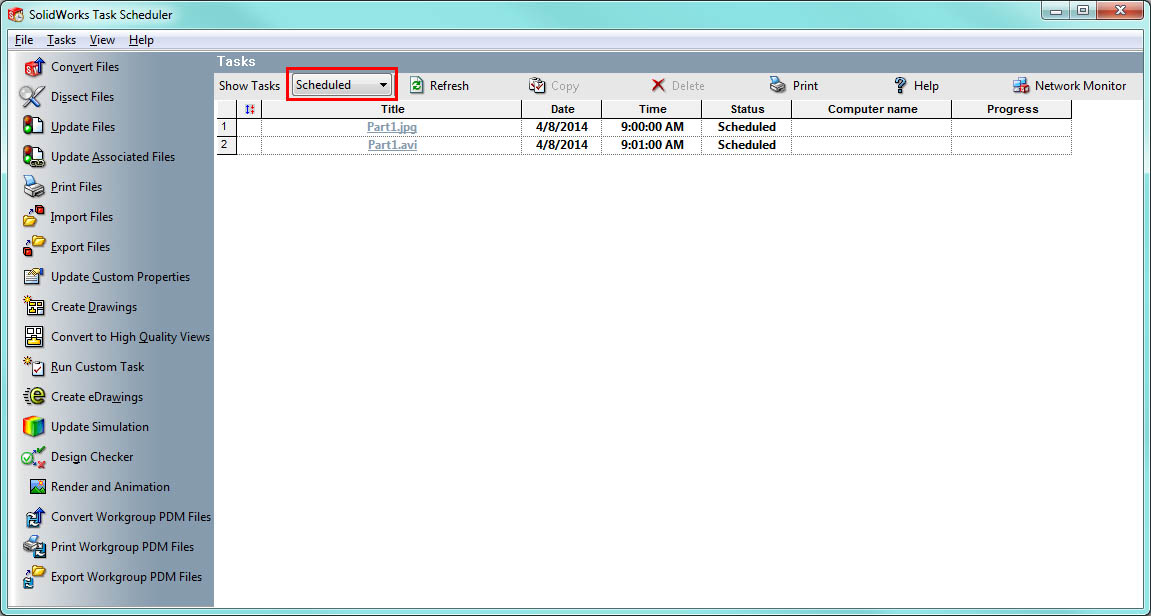
Click Finish. That’s it! Switch over to the SOLIDWORKS Task Scheduler. Next to Show Task, select Scheduled to see the tasks you created.
Convert Workgroup PDM Files
Many users and administrators become very stressed when a new major release of SOLIDWORKS comes out. With each update of SOLIDWORKS, the files have to be updated to the newest version. To help alleviate the need for a bottle of your favorite Antacid, the SOLIDWORKS Task Scheduler automates the conversion process for you. Convert Workgroup PDM Files does exactly that. It converts Workgroup PDM Files Vault files that were created at an earlier SOLIDWORKS release to the current release. You must have a Workgroup PDM client license installed on the computer using the SOLIDWORKS Task Scheduler.
Before we get started, please take a note of a few things:
- Back up all files before converting them
- Only vault administrators are allowed to convert files.
- The vault is locked automatically during the conversion process.
- All converted documents are opened in a resolved state (not lightweight). The computer must have enough memory to handle the resolved components.
- You can convert the entire vault or specific projects.
- You can specify that only the latest revision be converted.
- The list of files that convert successfully appears in Task Scheduler.
- Running the task on the vault server is not recommended because of the performance requirements.
- The system you run the task on must meet the recommended memory requirements for SolidWorks. Visit: http://solidworks.com/System_Requirements.
Note that you must be logged into Workgroup PDM first either through SOLIDWORKS or SOLIDWORKS Explorer. With that said, let’s get started. In the SOLIDWORKS Task Scheduler dialog box, click Convert Workgroup PDM Files.
You will be prompted to type in your Workgroup PDM user name, password, and the name of the computer with the Workgroup PDM Vault to login when you click on the Workgroup PDM tasks. The default user name for the administrator is pdmwadmin and the default password is pdmwadmin. You must have administrative privileges to update files. You are prompted for your user name, password, and computer name only the first time you create a Convert Workgroup PDM Files task in the current SOLIDWORKS Task Scheduler session.
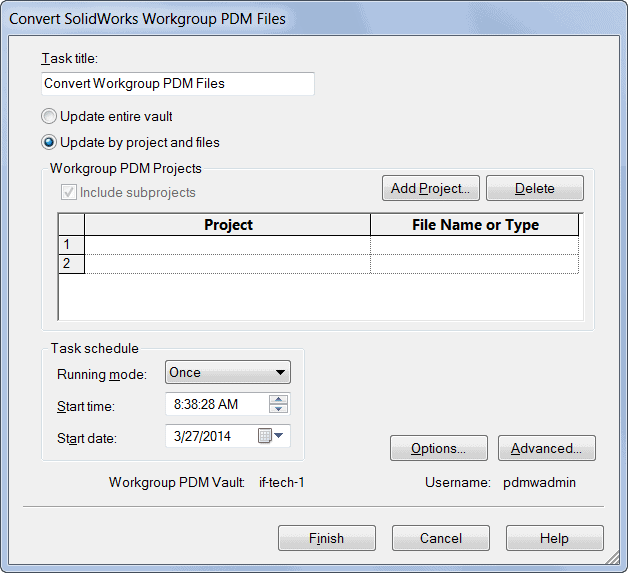
First, name your task. The default name is Convert Workgroup PDM Files, but you can use any name that you like. You are then given the option to update the entire vault or to specify projects and file types. We recommend choosing Update by project and files instead of trying to convert the complete vault in one operation.
Next, click the Add Project button. Only projects to which you have read-write access are displayed. Ask your administrator to enable read-write access to the projects you need to update. Select one of your projects from the list that appears in the Workgroup PDM Projects dialog box. You can include documents in subprojects in the print operation as well. You can add as many Projects as you wish. Every time you use the Add Project button, it adds another project to the list. If you add a wrong project or you change your mind, you can use the Delete button to remove a project from the list. To the right of the Project list is the column File Name or Type. You are given the ability to filter the files in a project based on type: parts (*.prt, *.sldprt), assemblies (*.asm, *.sldasm), drawings (*.drw, *.slddrw), all SOLIDWORKS files (*.sldprt, *.sldasm, *.slddrw), or all files (*.*). You can select a type from the list for each project.
Note: If a selected project uses standard library files from a shared location, these files must be accessible to the computer on which you are running the update.
Task Schedule
Whether you need to update your vault files just this one time or on a regular basis, you can schedule this to occur automatically. What if you forget which files you updated and which files are not updated yet? No problem! The Task Scheduler detects files that have already been updated and does nothing at subsequent tasks.
Task Scheduler lets you set the schedule. Pick from Once, Daily, Weekly, or Monthly. You can even control the exact start time and date. Note that Daily means that the task will run every day from the specified date, including Saturday and Sunday. Weekly means that the task will run on the same day of the week, like every Friday, and Monthly occurs on the same day of the month, like every first day of the month. If you choose 31 and February comes around, no task is scheduled for that month because that day of the month that does not exist.
Options
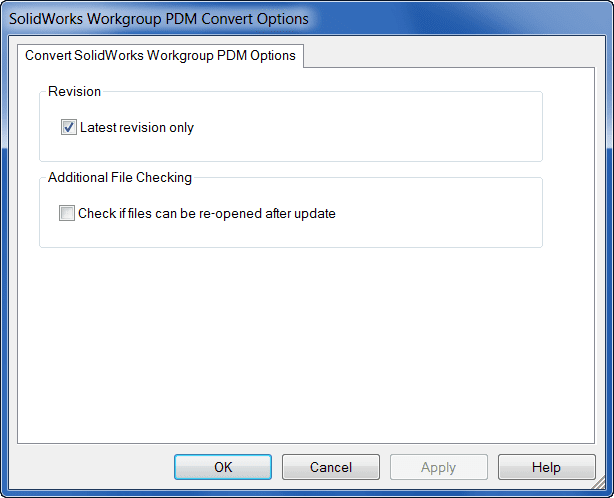
When you click the Options button, the SOLIDWORKS Workgroup PDM Convert Options dialog box appears.
These options are pretty self explanatory. We recommend keeping Latest revision only checked. If it is not checked, all revisions in the selected project or vault are updated. The other check box, Check if files can be re-opened after update, tells the Task Scheduler to re-open converted files to verify file integrity. If any issues are found, these will be reported, but it does not back out converted files from the vault. Please remember that using this option will obviously increase the conversion time greatly.
Advanced
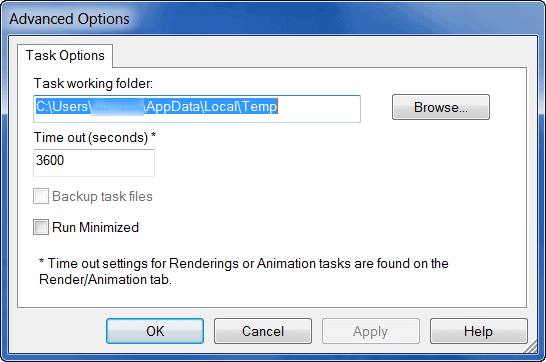
Click the Advanced button. As you can see, the Advanced Options dialog box for Convert Workgroup PDM Files lets you choose a Task working folder, the Time out (seconds), and Backup task files.
Be sure that the Task working folder that you choose has enough disk space to hold all the files. It is also a good idea to specify a Time out. You can check Run Minimized so that you do not see the SOLIDWORKS window open as it performs the task.
Once you have set all of your options, click Finish.
A dialog box will come up that shows you an estimate of the amount of time required to complete the conversion process. Click Yes to schedule the task. Click No to return to the Convert Workgroup PDM Files dialog box to make changes to the settings or to cancel the task. When you click Yes, the task and its title, scheduled time, scheduled date, and status appear in the Tasks panel. The status of the task is Scheduled. When the task is finished, the status changes to Completed.
Remember that your computer must be on at the scheduled start time. The SOLIDWORKS Task Scheduler window does not have to be open. What if you forget and your computer is off? Well, your computer turns on, then the task will run.
Print Workgroup PDM Files
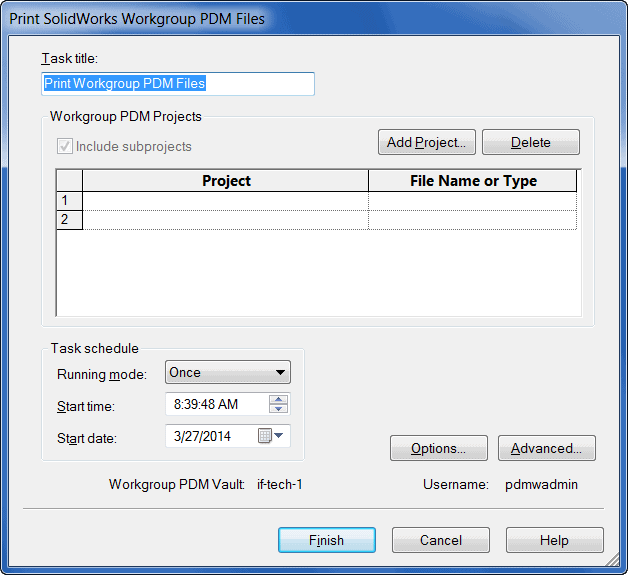
Do you ever get tired of having to open file, click File-Print, close the file, then open another file, click File-Print, close the file, and so on. Well, if you have a lot of files in the Workgroup PDM vault that you need printed, you don’t have to manually open each one to get them all printed out. All you need to do is to set up an easy batch print task using the SOLIDWORKS Task Scheduler. You can select the complete vault of just one project, filter for file type, and schedule a single job or recurring jobs. The documents are copied to a temporary folder, which you can specify, on your local drive. To get started, in the SOLIDWORKS Task Scheduler dialog box, click Print Workgroup PDM Files.
Log in with your Workgroup PDM user name and password and the name of the computer with the Workgroup PDM vault. You are only prompted for your user name, password, and computer name the first time when you create a Print Workgroup PDM Files task in the current SOLIDWORKS Task Scheduler session. In the Print Workgroup PDM Files dialog box, you can choose from several options. You can select the complete Vault of just one project, filter for file type, and schedule a single job or recurring jobs. The documents are copied to a temporary folder, which you can specify, on your local drive.
First, name your task. The default name is Print Workgroup PDM Files, but you can use any name that you like. Next, click the Add Project button. Only projects to which you have read-write access are displayed. Ask your administrator to enable read-write access to the projects you need to print. Select one of your projects from the list that appears in the Workgroup PDM Projects dialog box. You can include documents in subprojects in the print operation as well. You can add as many Projects as you wish. Every time you use the Add Project button, it adds another project to the list. If you add a wrong project or you change your mind, you can use the Delete button to remove a project from the list. To the right of the Project list is the column File Name or Type. You are given the ability to filter the files in a project based on type: parts (*.prt, *.sldprt), assemblies (*.asm, *.sldasm), drawings (*.drw, *.slddrw), all SOLIDWORKS files (*.sldprt, *.sldasm, *.slddrw), or all files (*.*). You can select a type from the list for each project.
Task Schedule
Whether you need to print your vault files just this one time or on a regular basis, you can schedule this to occur automatically. Task Schedule is a great feature to make your workload easier and to make sure that you do not forget. The Task Scheduler lets you set the schedule. Pick from Once, Daily, Weekly, or Monthly. You can even control the exact start time and date. Keep in mind that SOLIDWORKS Task Scheduler window does not need to be open when the files are scheduled to print, but your computer and printer must be on at the scheduled start time. If your computer is off at the scheduled start time, the task runs when you turn your computer on.
What Printer is Going to be Used?
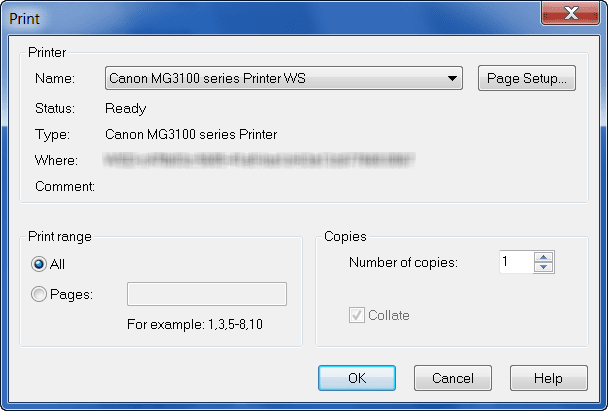
Most companies these days have more than one printer. So, please make sure that you use the Options button to specify what printer you want to use and any printer other options you need set.
Advanced
The Advanced Options dialog box for Print Workgroup PDM files lets you choose a Task working folder, the Time out (seconds), and Backup task files.
When you are ready to go, click Finish. The task and its title, scheduled time, scheduled date, and status appear in the Tasks panel. The status of the task is Scheduled. When the task is finished, the status changes to Completed.
Export Workgroup PDM Files
In the SOLIDWORKS Task Scheduler dialog box, click Export Workgroup PDM Files.
Log in with your Workgroup PDM user name and password and the name of the computer with the Workgroup PDM vault.
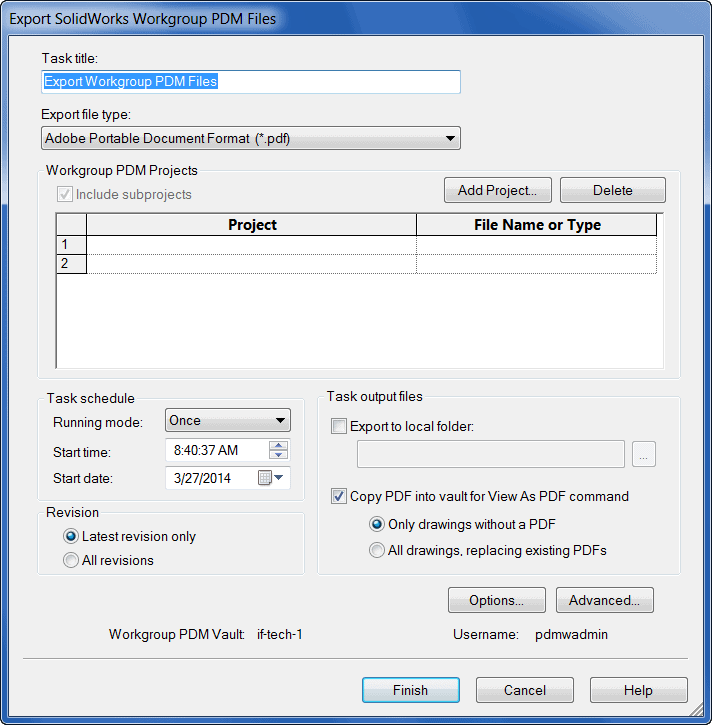
The Export Workgroup PDM file task lets you export files from your vault very easily. First, name your task. The default name is Export Workgroup PDM Files, but you can use any name that you like. Next, pick one of the Export file types. Choose from Dxf (*.dxf), Dwg (*.dwg), IGES (*.igs), Adobe Portable Document Format (*.pdf), STEP AP203 (*.step), STEP AP214 (*.step), and JPEG (*.jpg).
Click the Add Project button. Select one of your projects from the list that appears in the Workgroup PDM Projects dialog box, and then click OK. You can add as many Projects as you wish. Every time you use the Add Project button, it adds another project to the list. If you add a wrong project or you change your mind, you can use the Delete button to remove a project from the list. To the right of the Project list is the column File Name or Type. You are given the ability to filter the files in a project based on type: parts (*.prt, *.sldprt), assemblies (*.asm, *.sldasm), drawings (*.drw, *.slddrw), all SOLIDWORKS files (*.sldprt, *.sldasm, *.slddrw), or all files (*.*). You can select a type from the list for each project.
Whether you need to export your vault files just this one time or on a regular basis, you can schedule this to occur automatically. Task Schedule is a great feature to make your workload easier and to make sure that you do not forget. The Task Scheduler lets you set the schedule. Pick from Once, Daily, Weekly, or Monthly. You can even control the exact start time and date. So, rather than staying up all night at the office, you can be at home in bed while the Task Scheduler works for you. (Don’t tell your boss! Just let him keep wondering how you get so much work done! If you are the boss, sorry.)
Ever wonder where all these files are going to be stored? Do you have to worry about moving the files around and try to find what went where? Of course not! Just specify a folder where you want the exported files to be saved to. If you have done this before, Task Scheduler remembers the last export location you specified in the current session. You can also copy the files into the Workgroup PDM vault. Since the option is called Copy PDF into vault for View As PDF command, this is obviously only for the Adobe Portable Document Format only. Note that you cannot delete outdated PDFs from the vault, but you can replace them. Using the All drawings, replacing existing PDFs option ensures that PDFs are available and up-to-date for all drawings. The process is very straightforward. So, if you have a bunch of drawings to convert to pdf, you have the option to save the files in a folder of your choice, the Workgroup PDM vault, or both. Speaking of options, click the Options button.
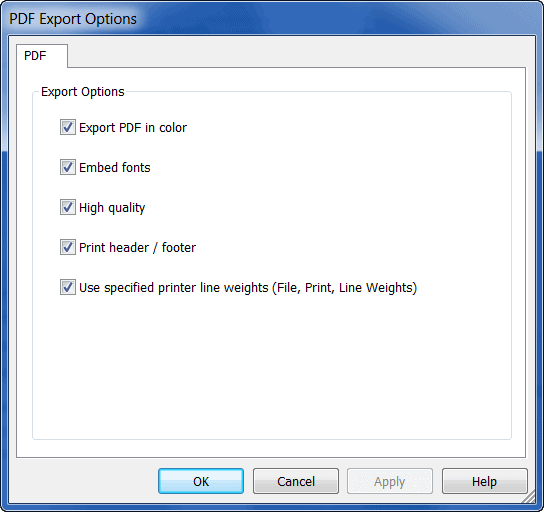
As the Export Options dialog box shows, you can indicate your export options for the export file type you selected back in Export file type. Note: Export options are available for all file types except JPG. Lastly, there is the Advanced button.
The Advanced Options dialog box for Export Workgroup PDM files lets you choose a Task working folder, the Time out (seconds), and Backup task files.
When you are ready to go, click Finish. The task and its title, scheduled time, scheduled date, and status appear in the Tasks panel. The status of the task is Scheduled. When the task is finished, the status changes to Completed.
We hope this series has given you an insight to how to access the tools in the SOLIDWORKS Task Scheduler. Please check back to the CATI Blog as the Dedicated Support Team will continue posting new series of articles every month that go further into the details of many of the SOLIDWORKS tools. All of these articles will be stored in the category of Daily Dose…..of SOLIDWORKS Support and links to each article with their release date are listed below:
- SOLIDWORKS Task Scheduler – Part1 (Bryan Pawlak 4/2/14)
- SOLIDWORKS Task Scheduler – Part2 (John Van Engen 4/3/14)
- SOLIDWORKS Task Scheduler – Part3 (Blake Cokinis 4/7/14)
- SOLIDWORKS Task Scheduler – Part4 (Neil Bucalo 4/8/14)
Neil Bucalo, CSWP
Certified SOLIDWORKS Support Technician
Computer Aided Technology, Inc.

 Blog
Blog 