SOLIDWORKS Task Scheduler - Part 1
This month we are going to take a deep dive into the SolidWorks Task Scheduler. This utility will allow you to set up tasks to run at a future time. Task scheduler will create a windows task that can occur once, daily, weekly, or monthly. We are breaking down the Task Scheduler in four articles, this article will cover the Licensing and Menu options as well as the tasks of Convert Files, Dissect Files, Update Files, and Update Associated Files.
The SOLIDWORKS Task Scheduler can be found under Start, All Programs, SOLIDWORKS 2014, SOLIDWORKS Tool, SOLIDWORKS Task Scheduler.
License Requirements:
You must have a license of SOLIDWORKS Office, or SOLIDWORKS Premium to have full access to the task scheduler functions. The task scheduler is installed with all versions of SolidWorks.
Standard versions of SOLIDWORKS only give you access to the following functions:
- Convert Files
- Dissect Files
- Convert Workgroup PDM
- Print Workgroup PDM
- Export Workgroup PDM
You can also run the Network Monitor and participate in distributed file conversions, but you cannot schedule any distributed tasks.
If you have a SOLIDWORKS Office or SOLIDWORKS Premium you will have full access to the following tasks:
- Convert Files
- Dissect Files
- Update files
- Update Associated Files
- Print Files
- Import Files
- Export Files
- Update Custom Properties
- Create Drawings
- Convert to High Quality Views
- Run Custom Task
- Create eDrawings
- Update Simulation
- Design Checker
- Render and Animation
- Convert Workgroup PDM
- Print Workgroup PDM
- Export Workgroup PDM
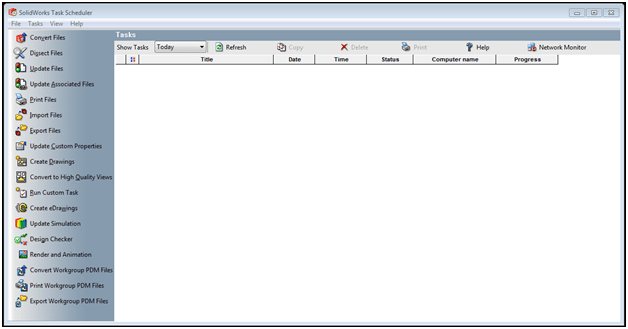
Menu options:
At the top of the Task Scheduler window there is your standard pull down menus.
-
File – Print, Print Preview, Print options, & Exit.
- This allows you to print out a list of the scheduled tasks
- Tasks – Convert Files, Dissect Files, Update files, Update Associated Files, Print Files, Import Files, Export Files, Update Custom Properties, Create Drawings, Convert to High Quality Views, Run Custom Task, Create eDrawings, Update Simulation, Design Checker, Render and Animation, Convert Workgroup PDM, Print Workgroup PDM & Export Workgroup PDM
-
View – Side Bar & Options
- The Side Bar option will toggle on and off the selection menu on the left side of the screen.
- Options are where you can control all of the settings for each of the functions. These can also be changed when accessing each individual function.
-
Help – SOLIDWORKS Task Scheduler help topics & About SOLIDWORKS Task Scheduler.
Task Functions: 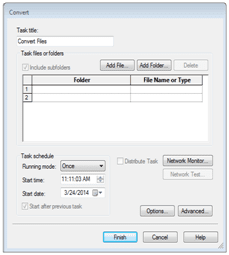
 Convert Files: Saves SOLIDWORKS files from an earlier version to the current release. This optimizes the performance for the latest software updates.
You can create a task to run on your machine, or one that is distributed to a group of machines.
Create Conversion Task:
- To create a conversion task, click on the convert files icon
 .
. - Type a name for the conversion task (or use the default name).
- Select the file(s) or folder(s) you want to convert. If you do not want to include subfolders you can clear the checkbox for "Include Subfolders".
- Choose how often you want to run the task. Once, Daily, Weekly, of Monthly.
- Choose a start time and date. (Make sure the time is later than your computer clock)
-
Click Options to change conversion settings and backup locations

-
Automatic update of BOM option
- Save pre-2003 drawings with "Automatic update of BOM" – this automatically updates a drawings bill of material when changes are made to the model for all drawing prior to 2003
-
Referenced files
- Update files with missing references or rebuild errors – this attempts the conversion process again after you restore the missing referenced files.
- Update files previously converted to SolidWorks – this will redo the file conversion for all files after observing errors.
-
Configurations Option
- Activate all configurations before saving (may improve performance when switching configurations)
- Save in active configuration only (may result in smaller files and shorter time to convert)
-
Backup Files

- Back up files to: – Select to make a backup zip archive of the files before they are converted
-

-
Task Options

- Task working folder – This is the file location the system will use to store data while performing the conversion task. This can include backup files, reports, ect…
-
Time out (seconds) – This is the maximum amount of time the conversion task will use to perform the task. If the system is saving a file when the timeout duration is reached, the save operation will be completed before the task terminates.
- Backup task files– select to save zip files before the task is performed.
- Run Minimized – This will run the task conversion in the background.
![]() Dissect Files: Break down SOLIDWORKS files to make their components available for reuse.
Dissect Files: Break down SOLIDWORKS files to make their components available for reuse.
When files are dissected:
- Parts are dissected into features (extrudes and cuts).
- Features are dissected into sketches.
- Drawings are dissected into general tables and blocks.
- DWG/DXF files are dissected into tables, blocks, and views.
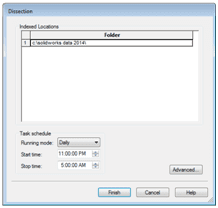
Create Dissect Task:
- To create a Dissect task, click on the dissect files icon
 .
. -
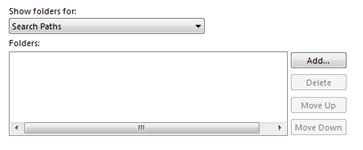
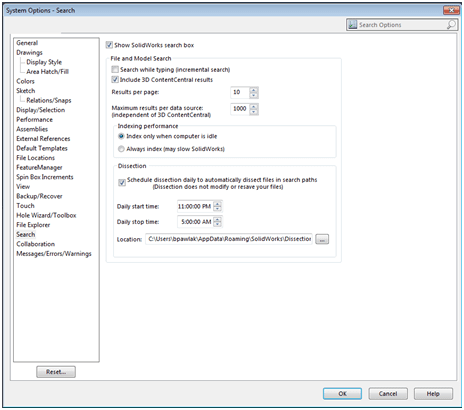
File locations for dissection are set under Tools, Options, File Locations, Search Paths.

- Choose how often you want to run the task. Once, Daily, Weekly, of Monthly.
- Choose a start time and date. (Make sure the time is later than your computer clock)
-
Click Advanced to change the working folder, time out values, & to run minimized
-

-
Task Options

- Task working folder – This is the file location the system will use to store data while performing the conversion task. This can include backup files, reports, ect.
-
Time out (seconds) – This is the maximum amount of time the conversion task will use to perform the task. If the system is saving a file when the timeout duration is reached, the save operation will be completed before the task terminates.
- Backup task files– select to save zip files before the task is performed.
- Run Minimized – This will run the task conversion in the background.
You can enable or disable dissection, as well as enable a daily task to dissect files in Options, Search![]() .
.
![]() Update Files: Rebuilds the specified documents with any changes made since the last time the model was rebuilt.
Update Files: Rebuilds the specified documents with any changes made since the last time the model was rebuilt.
You can specify one or more files, but you cannot specify a mix of files and folders in the same task.
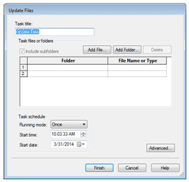
Create Update Task:
- To create an update task, click on the convert files icon
 .
. - Type a name for the update task (or use the default name).
- Select the file(s) or folder(s) you want to convert. If you do not want to include subfolders you can clear the checkbox for "Include Subfolders".
- Choose how often you want to run the task. Once, Daily, Weekly, of Monthly.
- Choose a start time and date. (Make sure the time is later than your computer clock)
-
Click Advanced to change the working folder, time out values, & to run minimized
-

-
Task Options
- Task working folder – This is the file location the system will use to store data while performing the conversion task. This can include backup files, reports, ect.
-
Time out (seconds) – This is the maximum amount of time the conversion task will use to perform the task. If the system is saving a file when the timeout duration is reached, the save operation will be completed before the task terminates.
- Backup task files– select to save zip files before the task is performed.
-
Run Minimized – This will run the task conversion in the background.
-

- Click Finish to create your scheduled task.
![]() Update Associated Files: Rebuilds the specified documents and its referenced documents with any changes made since the last time the model was rebuilt.
Update Associated Files: Rebuilds the specified documents and its referenced documents with any changes made since the last time the model was rebuilt.
Define the scope of the search for reference documents by specifying folders to search, file types to search for, and whether or not to limit the search to direct references only.
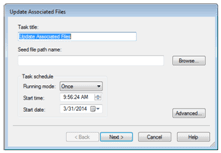
Create Update Associated Files Task:
- To create an update task, click on the convert files icon
 .
. - Type a name for the update associated files task (or use the default name).
-
Specify the seed file name.
- The seed file defines the starting point for the update associated files task. The seed file and its references will be updated.
- Click browse
- Select the file type of the seed file in Files of type.
- Browse to the seed file, then click open.
- Click the Next button to choose the search folders.
-
Select the folders and types of files you want to update.

- Click Add.
- Browse to the folder that contains the file to update, then click ok.
- Under the File Types column you can click in the row that contains your file to select the type of files.
- Check the box to update direct reference only
- Repeat this process for each addition folde

-

- Task Options
- Task working folder – This is the file location the system will use to store data while performing the conversion task. This can include backup files, reports, ect.
-
Time out (seconds) – This is the maximum amount of time the conversion task will use to perform the task. If the system is saving a file when the timeout duration is reached, the save operation will be completed before the task terminates.
- Backup task files– select to save zip files before the task is performed.
-
Run Minimized – This will run the task conversion in the background.
-
Click Finish to create your scheduled task.

We hope this series has given you an insight to how to access the tools in the SOLIDWORKS Task Scheduler. Please check back to the CATI Blog as the Dedicated Support Team will continue posting new series of articles every month that go further into the details of many of the SOLIDWORKS tools. All of these articles will be stored in the category of Daily Dose…..of SOLIDWORKS Support and links to each article with their release date are listed below:
- SOLIDWORKS Task Scheduler - Part1 (Bryan Pawlak 4/2/14)
- SOLIDWORKS Task Scheduler - Part2 (John Van Engen 4/3/14)
- SOLIDWORKS Task Scheduler – Part3 (Blake Cokinis 4/7/14)
- SOLIDWORKS Task Scheduler – Part4 (Neil Bucalo 4/8/14)