How to set 3DQPress Command Tabs in SolidWorks
Welcome to 3DQPress “how to setup”. The following blog will walk the new as well as current customers “How To” set up the SOLIDWORKS Command Manager with 3DQPress Tabs. This blog is broke out in 2 sections, New Instalation and Update Instalation for ease of use.
New Installation
1. Start SolidWorks.
2. Select the ToolsAdd-Insof SolidWorks.
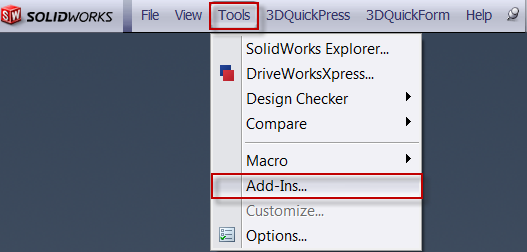
3. At the bottom of the SOLIDWORKS Add-Ins manager you will find the 3DQTools software that you have loaded, check both boxes so the software will auto-load when starting your next session of SolidWorks.
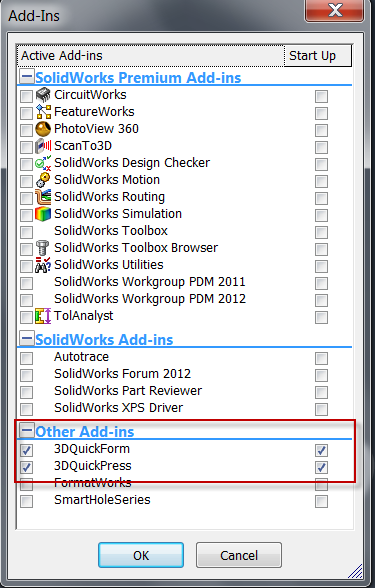
4. Close the Add-Ins manager.
5. 3DQPress will prompt “Do you have a Hardware Dongle”
a. “No” means you are running a TEMP code, continue by copy and paste the temp registration code that was sent to you by 3DQPress representative.
b. “Yes” means you have receive your hardware dongle, continue by plugging the dongle into one of your USB port, wait for the hardware to acknowledge the new dongle and download the driver software if needed. Copy and paste the serial number then select UPDATE tab, continue by copy and paste the registration code then select UPDATE tab, then close.
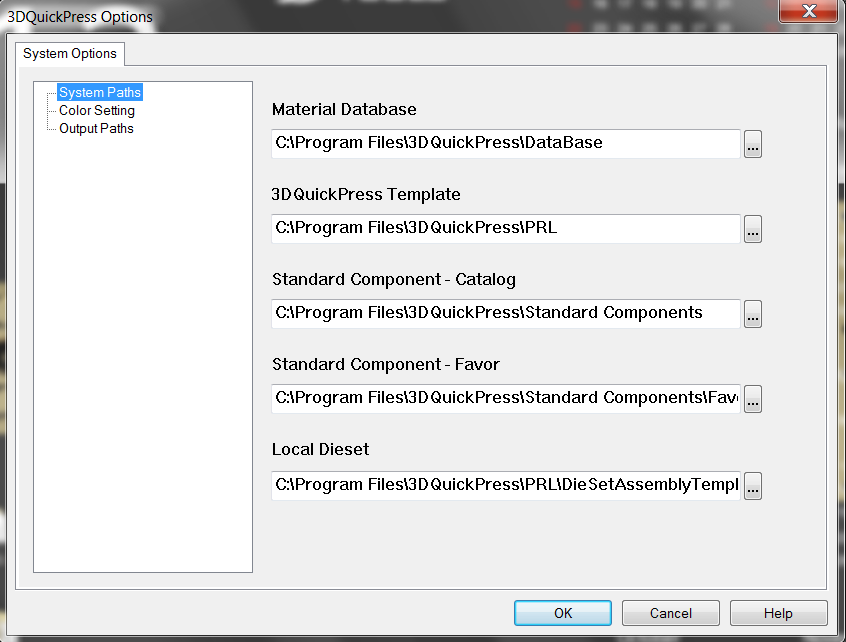
6. Once the software has loaded and the registry is complete you will see the 3DQPress Options menu, this shows the paths to the currently loaded files.
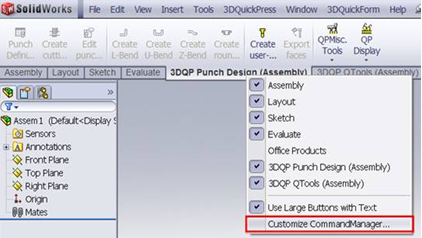
7. After selecting OK to complete the Add-Ins loading, the 3DQTools software has will be displayed in the SOLIDWORKS top ribbon.
![]()
8. Close SOLIDWORKS to find the Commands Manager Registry tab on your desktop.
9. Double click on “3DQP ComTabs.reg” and say “Yes” when asked to update the command manager tabs. Note: If a “3DQP ComTabs.reg” is not on your desk top skip to #12

10. Delete the “3DQP ComTabs.reg” Part and Assembly files from your desktop then start SOLIDWORKS again, after opening a Part or Assembly file you will see the new 3DQPress Commands Manager Tabs.
11. If, when loading the software you are prompt “Unable to register the DLL/OCX: RegSvr32 failed with exit code 0x3” Windows denied the registration of 3DQP.
12. Contact your 3DQPress representative at 920.268.1721 or email Ronf@callsts.com .
Update Installation
1. Start SolidWorks.
2. Start a new Part file.
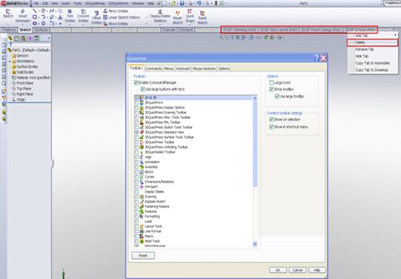
3. Right click on Command Manager Tabs and select Customize Command Manager.
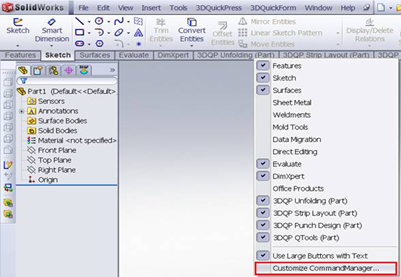
4. Right click on the 3DQuickPress Command Manager tabs and select Delete to remove current 3DQPress Command Tabs.
5. Select FileSave the part file to your desktop.
6. Click OK to exit.
7. Start a new Assembly file.
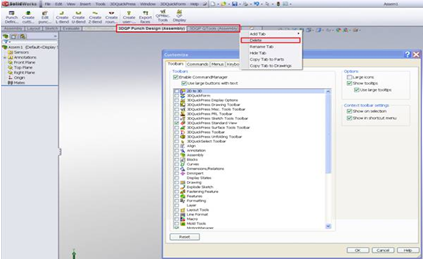
8. Right click on Command Manager Tabs and select Customize Command Manager.
9. Right click on the 3DQuickPress Command Manager tabs and select Delete.
10. Select FileSave the Assembly file to your desktop.
11. Click OK to exit.
12. Close all documents and exit SolidWorks.
13. Double click on “3DQP ComTabs.reg” and say “Yes” when asked to update the command manager tabs. Delete the “3DQP ComTabs.reg” and Start SOLIDWORKS again, you should see the new 3DQPress Commands Manager Tabs. Note: If a “3DQP ComTabs.reg” is not on your desk top skip to #16.

14. Delete the “3DQP ComTabs.reg” Part and Assembly files from your desktop then start SOLIDWORKS again, after opening a Part or Assembly file you will see the new 3DQPress Commands Manager Tabs.
15. If, when loading the software you are prompt “Unable to register the DLL/OCX: RegSvr32 failed with exit code 0x3” Windows denied the registration of 3DQP.
16. Contact your 3DQPress representative at 920.268.1721 or email Ronf@callsts.com .